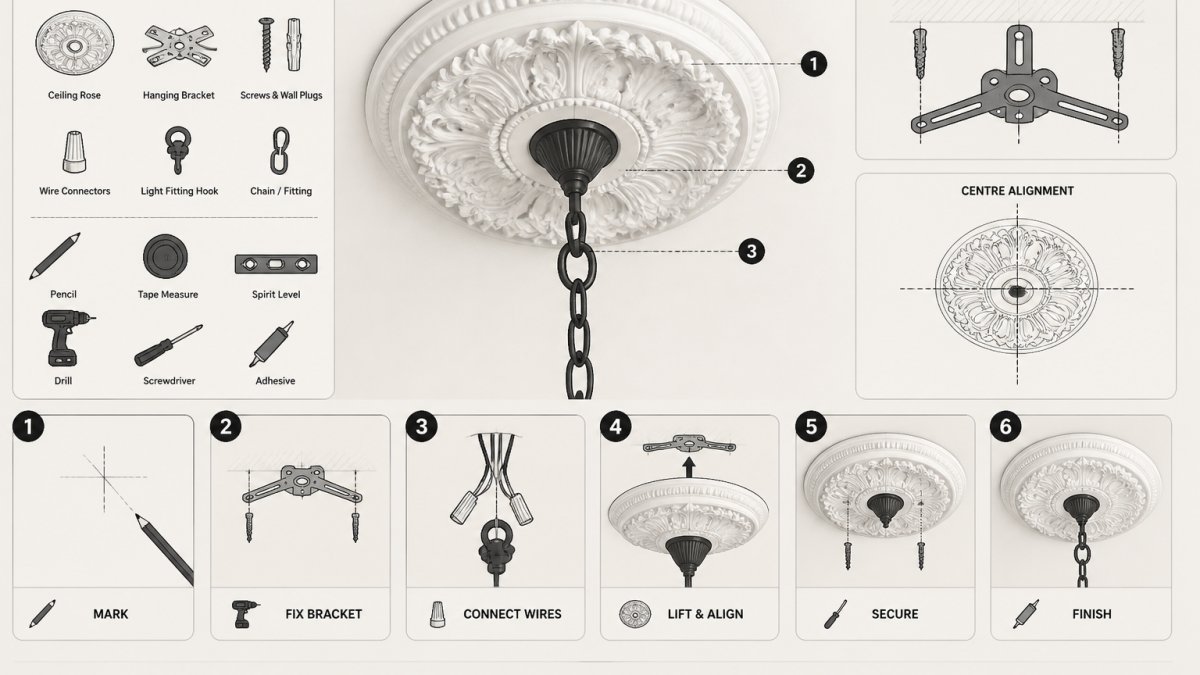
Table of Contents
- What You'll Need: Ceiling Rose Installation Tools
- Preparing Your Ceiling and Assessing Load
- Finding and Marking the Ceiling Centre
- Installing a Ceiling Rose Around a Light Fitting
- Choosing and Applying the Right Ceiling Rose Adhesive
- Common Ceiling Rose Installation Mistakes to Avoid
- Supporting and Finishing Your Ornate Ceiling Rose
- Frequently Asked Questions
Last Updated: October 14, 2026
What You'll Need: Ceiling Rose Installation Tools
To install ornate ceiling roses correctly, you need the right tools.
Start with measuring and marking tools. A measuring tape, pencil, and chalk line locate the exact centre of your ceiling, while a spirit level ensures the rose sits horizontal.
Surface preparation matters as much as installation. Grab sandpaper (120-grit and 180-grit), a sanding block, and a dust mask.
For adhesive application, you'll need:
- An adhesive spreader or old kitchen knife
- A notched spreader (if using trowel-applied adhesive)
- A clean cloth for wiping excess
- The right adhesive for your ceiling type
Finally, bring safety equipment. A sturdy ladder or scaffolding platform keeps you safe overhead, and safety glasses protect against dust and falling debris.
Preparing Your Ceiling and Assessing Load
Before you install ornate ceiling roses, assess whether your ceiling can support the weight. This prevents costly mistakes and safety hazards.
Check your ceiling type first. Plasterboard ceilings are lighter and common in modern homes; older plaster ceilings are denser and stronger.
Inspect the ceiling surface carefully. Look for:
- Cracks or splits in plaster
- Soft or spongy areas when you press gently
- Water stains or discolouration
- Areas where plaster is loose or hollow-sounding
A small ornate ceiling rose (under 2 kg) works on most ceilings, while larger roses (3-5 kg or more) need stronger support.
Clean the ceiling thoroughly. Dust, cobwebs, and loose paint prevent proper bonding.
Finding and Marking the Ceiling Centre
Locating the exact ceiling centre is crucial for a balanced installation. An off-centre rose looks obviously wrong and is hard to correct once adhesive sets.
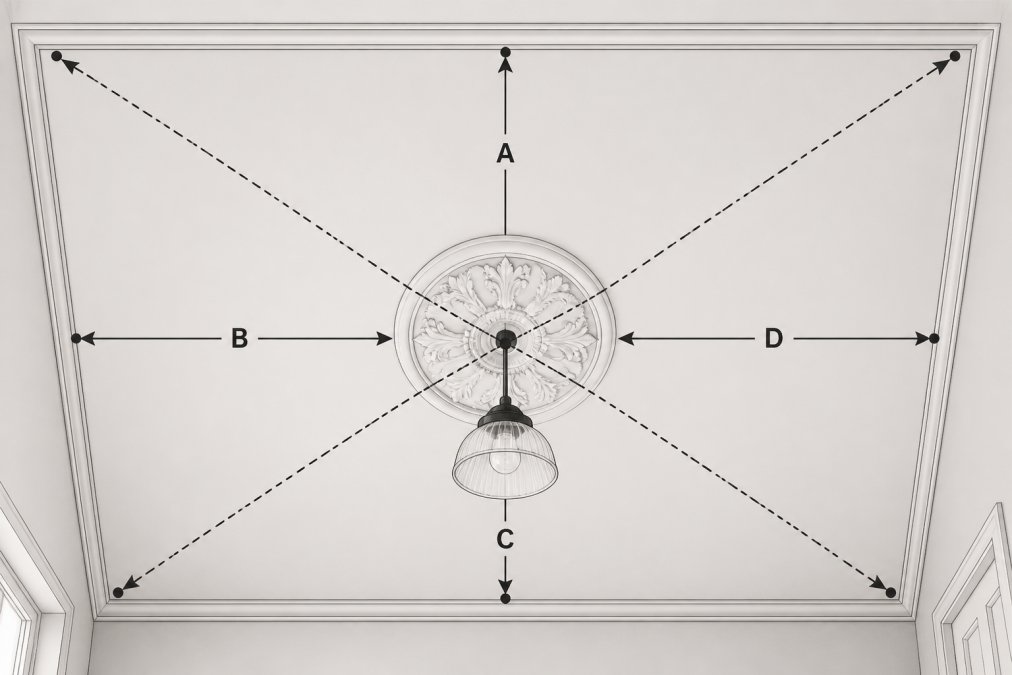
The simplest method uses diagonal lines. Measure the ceiling's length and width, mark the midpoint of each wall at ceiling height, and snap chalk lines from opposite corners.
If installing around an existing light fitting, measure from the fitting's centre outward so the rose sits concentrically.
Verify your marks with a measuring tape: distances from each wall to the centre point should be equal on opposite sides.
Installing a Ceiling Rose Around a Light Fitting
Position the rose carefully around your light fitting. Most ornate ceiling roses have a centre hole for the fitting to pass through; some have a removable collar that slides over it after installation.
Start by dry-fitting the rose. Hold it to the ceiling, aligned with your centre mark, and check it sits level with the fitting passing through the centre hole without forcing.
Once satisfied with the position, apply adhesive per the manufacturer's instructions.
Press the rose firmly against the ceiling, holding for the time specified on the packaging (usually 30-60 seconds).
Electrical Safety and Wiring Boundaries
Never cut or modify electrical wiring to fit a ceiling rose. Damaged wiring creates serious fire and shock hazards.
Before installation, identify wiring boundaries near your light fitting. Most fittings have wiring entering through conduit or a junction box, keep adhesive and tools well clear.
If unsure about electrical safety, consult a qualified electrician first. They can confirm your installation won't create hazards and that wiring is properly protected, especially important in heritage homes where wiring may be older or non-standard.
Choosing and Applying the Right Ceiling Rose Adhesive
The adhesive you choose determines how well your rose stays put long-term. Rather than a general-purpose grab adhesive, match the product class to the rose weight, substrate, and expected ceiling movement.
Adhesive classes and where each suits
- Flexible decorative adhesives (modified silicone or acrylic-based). These stay slightly elastic after curing, which lets them absorb the seasonal movement of a timber-framed ceiling without cracking. Best for plasterboard ceilings and lightweight roses under roughly 2 kg.
- Heavy-duty construction adhesives (solvent-free polyurethane or hybrid polymer). Higher grab and higher shear strength, suited to plaster and lath-and-plaster ceilings and to roses in the 3-5 kg range. They tolerate slight surface irregularity better than rigid adhesives.
- Gypsum-based bedding compounds. Used mainly with plaster roses where the installer wants a rigid, sandable joint that can be feathered into the ceiling. They offer almost no flexibility, so they suit stable masonry or solid plaster ceilings rather than suspended plasterboard.
Avoid rigid, brittle adhesives on plasterboard. The board flexes slightly under load and with humidity, and a brittle bond will crack at the perimeter rather than flex with it.
When mechanical fixings are needed
Adhesive alone is not always sufficient. A common pattern among installers is to add mechanical support when any of the following applies:
- The rose weighs more than about 5 kg.
- The ceiling is lath-and-plaster with hollow or drummy areas.
- The rose has a deep, heavy profile that puts load well away from the centre.
- The ceiling is subject to vibration, such as under a second-storey floor or near a door.
Use countersunk screws long enough to reach solid timber or a fixing anchor, positioned where they will be hidden by the rose's decorative relief. Pre-drill to avoid splitting plaster. Fill the screw heads after curing and sand flush before painting.
Never rely on adhesive alone to support a rose that also carries a light fitting. The fitting's weight and any heat it generates should be supported independently by the ceiling structure, not by the rose.
Application technique and coverage
Apply adhesive in a consistent pattern rather than a single central blob. A grid of beads or dots spaced roughly 100-150 mm apart, plus a continuous bead around the outer edge, gives even support and prevents the rim from lifting.
Coverage matters more than quantity. Too little adhesive leaves unsupported spans that flex and crack; too much squeezes out over the decorative face and is difficult to remove without damaging fine detail. As a working guide, a 500 mm rose typically needs a bead pattern covering most of its back, while a small 300 mm rose needs proportionally less.
Setting and curing times vary by product
Do not assume one timing suits every adhesive. Setting time (when the rose stops moving) and full cure time (when the bond reaches full strength) are different things:
- Flexible decorative adhesives typically set within 30-60 seconds of firm pressure but may take 24-48 hours to cure fully.
- Polyurethane and hybrid construction adhesives often need 24 hours before supports can be removed, and up to 7 days to reach full strength, especially in cool or humid conditions.
- Gypsum bedding compounds set by chemical reaction and can be sanded sooner, but still need protection from movement until fully hard.
Always follow the manufacturer's stated times on the packaging, and extend them in cold weather or high humidity. If in doubt, leave supports in place longer rather than shorter.
Common Ceiling Rose Installation Mistakes to Avoid
Even experienced installers make mistakes that compromise the final result. Learning what goes wrong helps you get it right the first time.
The biggest mistake is rushing surface preparation.
Another common error is misaligning the rose. Once adhesive sets, repositioning is nearly impossible without damage.
Too little adhesive leaves gaps and weak spots; too much squeezes out, creating mess and potentially damaging decorative details.
Don't skip the support phase while adhesive cures.
Ignoring ceiling condition is risky. A rose on a damaged or weak ceiling will eventually fail, repair it first or accept it won't stay secure.
Supporting and Finishing Your Ornate Ceiling Rose
While adhesive cures, support the rose to prevent it sagging or tilting. This temporary support is essential for heavy ornate roses and critical on older plaster ceilings.
Supporting the rose correctly
Use adjustable props, timber battens cut to length, or purpose-made ceiling props. The aim is even pressure across the whole back of the rose, not a single point load that can crack the plaster.
Leave supports in place for the full curing time stated by the adhesive manufacturer. As a rule of thumb, allow at least 24 hours, and up to 48-72 hours in cool or humid conditions. Removing props early is one of the most common causes of a rose dropping weeks later.
If you are working alone, dry-fit the rose and mark prop positions on the ceiling before you apply adhesive. Once the rose is up and sticky, repositioning props is awkward and risks smearing adhesive across the face.
Correcting alignment before the adhesive cures
You have a short window after pressing the rose home to make small adjustments. If the rose is slightly off-centre or tilted:
- Apply gentle, even pressure to the high side to seat it further into the adhesive.
- Use a spirit level across the face to check for tilt.
- If the rose has shifted significantly, remove it immediately, scrape off the adhesive while still soft, clean both surfaces and start again. Trying to slide a partly-set rose will tear the bond and damage the ceiling.
Once the adhesive has begun to skin over, stop adjusting. Further movement weakens the bond.
Filling gaps and repairing edges
Small gaps between the rose and the ceiling are normal, especially on older uneven plaster. Fill them after the adhesive has cured:
- Use a fine filler or gypsum-based compound that can be sanded.
- Work it into the gap with a flexible blade, then strike it off flush with the ceiling.
- Let it dry fully before sanding.
For cracks in the rose itself, use a filler matched to the rose material. Plaster roses take gypsum filler; resin or composition roses need a flexible filler that will not shrink and pull away.
Sanding and surface preparation for painting
Once the adhesive and any filler are fully cured, sand the joints and any rough areas:
- Start with 120-grit to knock down high spots and filler ridges.
- Finish with 180-grit or finer for a smooth surface that takes paint evenly.
- Wipe away all dust with a damp sponge and let the surface dry completely.
Do not sand while the adhesive is still soft. You will drag the bond and create a visible ridge.
Priming and painting
Bare plaster roses are porous and will drink the first coat of paint unevenly. Apply a suitable primer or sealer first, then finish with a paint system appropriate to the room:
- Water-based acrylic is the common choice for interior ceilings. It is low-odour, dries quickly and can be recoated in a few hours.
- Oil-based or alkyd enamel gives a harder, more washable finish and is often used in hallways and period rooms, but needs longer drying times and good ventilation.
Apply two thin coats rather than one thick coat. Thick paint obscures fine decorative detail and can sag. Use a brush for the relief and a small roller for flat areas, and cut in carefully around the light fitting.
For heritage homes, match the finish to the original. Many ornate ceiling roses were painted cream, white, or to match the ceiling colour. Check whether the rose requires sealing or special paint for longevity. At Restoration Station, we can advise on period-appropriate finishes that protect your rose while maintaining its authentic appearance.
Frequently Asked Questions
What is the best adhesive for hanging ceiling roses?
Cornice adhesive or heavy-duty decorative plaster adhesive works best for ornate ceiling roses. Choose a product rated for plaster or plasterboard depending on your ceiling type. Ensure the adhesive can support the rose's weight and allows sufficient working time (typically 10-15 minutes) before it begins to set. Always follow the manufacturer's instructions and allow full curing time, usually 24-48 hours, before painting or applying stress to the installation.
How do you centre a ceiling rose over a light fitting?
Find the ceiling centre by measuring diagonally from opposite corners and marking where the lines intersect. This point should align with your light fitting. Use a measuring tape and pencil to mark the exact centre, then position the rose's central hole over this point. For ornate designs, step back and view from below to ensure visual alignment. If the light fitting is offset, position the rose for visual balance rather than strict geometric centre.
How long should adhesive cure before painting a ceiling rose?
Most cornice adhesives require 24-48 hours full curing before painting. Check your adhesive's technical data sheet for exact times, as this varies by product and environmental conditions. Temperature and humidity affect curing speed; cooler or more humid conditions may require longer. Do not paint, sand, or apply pressure until fully cured, as incomplete curing can compromise the bond and cause the rose to shift or fail.
Can you install a ceiling rose around an existing light fitting?
Yes, but electrical safety is essential. Isolate the circuit at the switchboard before starting work. The rose's central hole must accommodate the light fitting's wiring and body. Ensure the adhesive does not contact electrical components, and maintain clearance around any heat-generating bulbs. If unsure about wiring or fitting compatibility, consult a qualified electrician. Modern fittings may have different dimensions than period-appropriate ones, so verify fit before committing adhesive.