Table of Contents
- How to Clean Vintage Brass Door Fittings: Step-by-Step
- Identify Solid Brass, Plated Metal and Lacquer Before You Clean
- How to Clean Antique Brass Hardware: Removal, Dusting and Soaking
- Brass Cleaning with Dish Soap: The Gentle Method for Light Tarnish
- How to Clean Lacquered Brass Without Stripping the Coating
- How to Preserve Brass Patina and Historical Value
- Comparing Cleaning Methods by Tarnish Severity
- Conclusion
- Frequently Asked Questions
Last Updated: October 19, 2026
How to Clean Vintage Brass Door Fittings: Step-by-Step
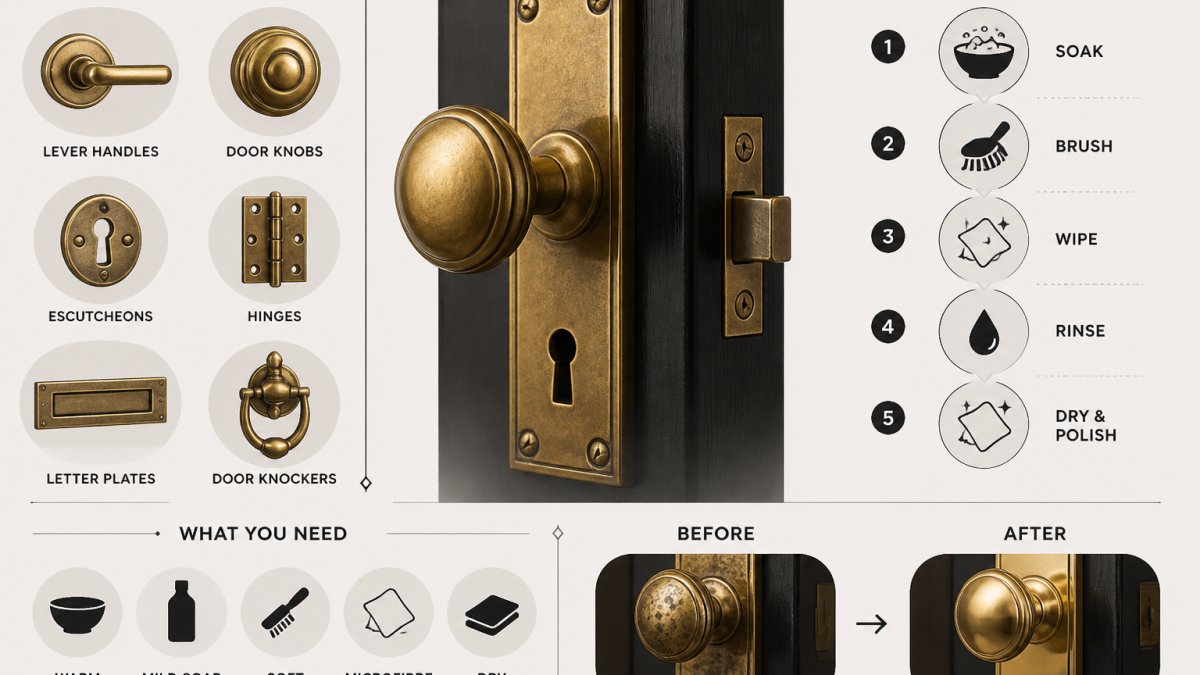
Vintage brass door fittings reward patience more than effort. At Restoration Station, we've spent 35 years helping owners of heritage and Federation-style homes keep original hardware in service, and the single biggest mistake we see is reaching for an abrasive cleaner before checking what the metal actually is.
The steps below work through the whole job in order:
- Identify the metal and any coating
- Remove the fitting from the door
- Dust and soak
- Clean according to tarnish level
- Rinse, dry and buff
- Refit and protect
Below, we'll show you exactly how to clean vintage brass door fittings without stripping patina or lacquer. But first, here's what most guides get wrong: they treat every brass item the same. Plated, lacquered and solid brass each need a different approach.
Identify Solid Brass, Plated Metal and Lacquer Before You Clean
Solid brass is brass all the way through, so it can be polished back to a bright shine again and again. Brass-plated metal is a thin brass layer over steel or zinc, and that layer wears away with scrubbing. Lacquered brass has a clear protective coating over the metal, and harsh cleaners eat straight through it.
Here's how to tell them apart:
- Check for wear: pale silver-grey showing at edges means brass plating over base metal.
- Look for flaking: patchy shine with a plastic-like film points to old lacquer.
- Try a magnet: a strong pull suggests plated steel underneath, since solid brass is not magnetic.
- Test a hidden spot: a tiny drop of polish on the back of a plate tells you how the surface reacts.
If the coating is intact and the brass looks good, stop there. Cleaning a sound lacquered finish does more harm than good.
How to Clean Antique Brass Hardware: Removal, Dusting and Soaking
Removing the hardware first is the step most people skip, and it's the one that decides the result. Working on a door with the fitting still attached means drips down the timber, missed edges and a wobbly handle when you finish. It also means you cannot properly clean the recesses where grime collects, the screw cups, the backplate edges, the spindle hole.
Work in this order:
- Photograph the fitting in place so you know exactly how it refits. Take one wide shot of the door and one close-up of each fitting, including the screw positions.
- Identify each component before you undo anything. A typical vintage door set has a knob or lever, a rose or backplate, a spindle, a mortice latch or lock body, and an escutcheon (keyhole plate). Knowing what each part does stops you losing a spring or a grub screw.
- Undo the fixings with a screwdriver that fits the slot properly, not one that slips. Slotted screws on older fittings are soft; a slipping driver chews the slot and makes refitting harder.
- Support the fitting as the last screw comes out. Knobs and levers can drop once the spindle is free, and a dropped brass rose dents easily on tile or timber.
- Bag the screws and label them by door. A common pattern is one bag per door with a strip of masking tape noting the room.
- Dust with a soft cloth or soft-bristled brush to lift loose dirt from recesses and screw holes before any water goes near the metal.
- Soak only the removable metal parts in warm water with a few drops of dish soap for five to ten minutes. Keep the water warm, not hot, very hot water can soften old lacquer and loosen shellac or wax fills.
What not to soak
Never soak a fitting with a timber, leather, enamel, bone or ivory insert. Wipe those by hand with a barely damp cloth instead. The same applies to fittings with a painted or enamelled face, and to anything with a visible maker's mark stamped into a thin plate, prolonged soaking can lift dirt out from under the stamp and leave a halo.
Protecting the door while the fitting is off
With the hardware removed, the door face is exposed. Tape over the screw holes with low-tack masking tape so water and cleaner don't track into the timber, and lay the fittings on a towel rather than directly on a workbench. Brass scratches easily against grit.
Brass Cleaning with Dish Soap: The Gentle Method for Light Tarnish
Brass cleaning with dish soap is the right first move for light tarnish, dull glow and everyday surface grime. It removes dirt without touching the metal or any remaining coating.
Mix a few drops of dish soap into warm water. Dip a soft cloth, wring it out, and wipe the fitting in a circular motion. For crevices, use a soft-bristled brush, never wire wool.
Water left sitting on brass causes spotting, so drying is not optional.
How to Clean Lacquered Brass Without Stripping the Coating
How to clean lacquered brass comes down to one rule: clean the coating, not the metal underneath. The lacquer is doing the protective work, and once it's gone the brass will tarnish far faster than it did originally.
Use only:
- Warm water with a drop of dish soap
- A soft cloth
- A soft-bristled brush for detail work
Avoid ammonia, abrasive creams, vinegar pastes and metal polishes on lacquered surfaces. All of them dull or remove the coating. If the lacquer is already flaking, the choice is to live with the wear or have the fitting stripped and re-lacquered properly. Re-lacquering is a job for a specialist, not a weekend project.
How to Preserve Brass Patina and Historical Value
Patina is the darkened, mottled surface that develops on brass over decades, and on antique hardware it is part of the object's value. How to preserve brass patina is really a question of restraint: clean the dirt, leave the colour.
A heavily polished fitting can look newer than the house it sits in. On a heritage-listed property, over-polishing can also count against you, since original finish is part of what makes the building significant. Check with your local council's heritage adviser before you polish anything original.
Comparing Cleaning Methods by Tarnish Severity
Match the method to the tarnish, not to habit. The matrix below shows which approach suits each combination of tarnish level and finish, and the notes underneath explain the trade-offs the table can't show.
| Method | Light tarnish | Moderate tarnish | Heavy tarnish | Safe on lacquer? | Safe near timber? |
|---|---|---|---|---|---|
| Dish soap and water | Best choice | Good first step | Loosens surface grime | Yes | Yes, if wrung out |
| Vinegar and salt paste | Too harsh | Short dwell only | Not recommended | No | No, acid etches timber |
| Commercial brass polish | Unnecessary | Good choice | Works with buffing | No | Wipe residue off timber |
| Ammonia soak | Avoid | Avoid | Specialist only | No | No, fumes and drips |
| Professional refinishing | No | No | Best for antiques | Yes, with re-lacquering | N/A |
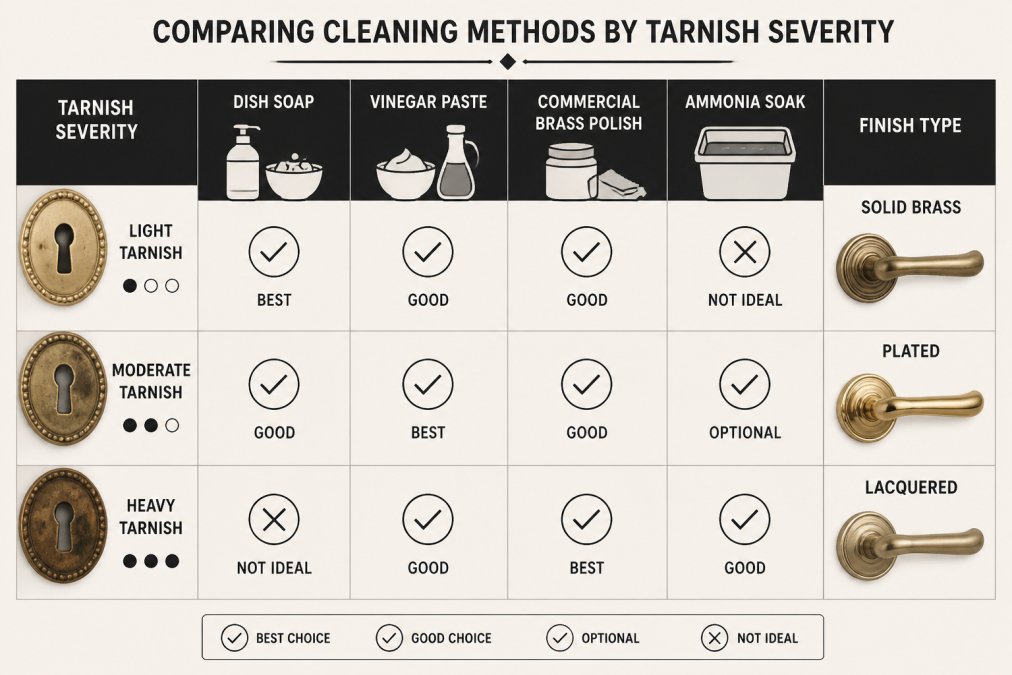
How to read the matrix
Light tarnish, a dull haze, fingerprint marks, or a slight brown tint that wipes away with a thumb.
Moderate tarnish, a clear brown or greenish film that soap won't shift, but the metal underneath is still smooth. On unlacquered solid brass, a commercial brass polish applied sparingly and buffed with a soft cloth is the right step.
Heavy tarnish, thick dark patina, pitting, or green verdigris in the recesses. Verdigris is mildly corrosive and should be removed, but the method depends on value.
The trade-offs the table can't show
- Vinegar and salt paste works fast because the acid dissolves tarnish, but it keeps working after you rinse. It can leave a slightly pink cast on brass if left too long, and it strips lacquer on contact. Use it only on unlacquered solid brass, keep the dwell time short, and rinse thoroughly.
- Ammonia is effective on heavy tarnish but the fumes are strong and it attacks lacquer, shellac and some plastics. If you use it at all, work in a well-ventilated space, away from the door, and never on a fitting with an insert.
- Commercial brass polish varies widely. Cream polishes are gentler than liquid polishes, and liquid polishes with a high solvent content can dull a lacquered surface in seconds. Read the label for the finish it is intended for.
- Abrasive methods, wire wool, scouring pads, toothpaste with grit, remove metal, not just tarnish. On a vintage fitting with crisp detail, abrasives round off the edges and erase the sharpness that gives the piece its character. Avoid them on anything you care about.
Ventilation and workspace
Do the polishing step outdoors or in a well-ventilated space, on a surface you don't mind marking. Polish residue stains timber and fabric, so keep a dedicated cloth for the job and wash your hands before handling the door again. If you are working near finished timber, mask the surrounding area with a cloth rather than relying on a steady hand.
For heavy tarnish on a valuable antique, professional conservation is the safer call. For everyday solid brass door knobs and handles, soap and a soft cloth handle most jobs.
Conclusion
The hard part of cleaning vintage brass isn't the scrubbing, it's knowing when to stop. Identify the metal and coating first, remove the fitting, clean gently, and leave the patina alone unless you have a clear reason to polish it.
If a fitting is too far gone to clean, or you need period-correct replacements that suit a Colonial or Federation home, Restoration Station can help. We stock many traditional door furniture and architectural hardware, back it with expert advice from 35 years in the trade, and ship across Australia.
Frequently Asked Questions
How do you tell whether vintage brass door fittings are lacquered?
Look for a uniform, glossy sheen that doesn't dull or tarnish over time, and check for peeling or flaking at edges and joints. A lacquered finish also feels slightly slick compared to raw brass. If you're unsure, test a hidden spot with a tiny amount of acetone on a cotton swab; if a clear film lifts, it's lacquered. Knowing this before you clean brass door fittings prevents you from stripping a protective coating you meant to keep.
Can vinegar damage vintage brass?
Vinegar is acidic and can pit or discolour brass if left on too long, especially on plated metal where it may eat through the thin brass layer. Use a vinegar-and-salt paste only on solid brass with heavy tarnish, leave it for no more than a few minutes, and rinse thoroughly. For routine cleaning of brass door fittings, dish soap and warm water are safer. Never use vinegar on lacquered or patinated pieces you want to preserve.
How do you clean brass without removing its patina?
Skip abrasive polishes and acidic soaks. Instead, dust regularly with a soft cloth, wash with mild dish soap and warm water, and dry immediately. A coat of microcrystalline wax or a thin layer of mineral oil can slow further oxidation without stripping the dark, aged look. This approach suits antique brass hardware where the patina is part of the piece's historical character and value.
When should you avoid polishing antique brass door fittings?
Avoid polishing when the piece has a deliberate patina that adds historical value, when the finish is lacquered (polish won't reach the metal and may cloud the coating), or when the hardware is brass-plated and the plating is already worn. In these cases, gentle cleaning with dish soap and a soft cloth is enough. If the tarnish is severe or the piece is fragile, consult a professional conservator before attempting any polish.